What is RISC-V?
Everyone (including me) is excited about RISC-V these days, but what exactly is it? How can I get started learning more about it? My favorite way to find out these things is to dive into the deep end of the pool and just start playing with it. In this series of articles, I will show you what I’ve done and show you how you can get started, too.
Once the surface of the Earth cooled, then the oceans formed… No, wait, let’s back up. RISC (without the Roman numeral for “5” suffix) is an acronym for Reduced Instruction Set Computer. An instuction set defines the commands that a particular device can execute. Due to the imprecise nature of English noun modifiers, there was once debate over whether this meant the instructions themselves were reduced or the instruction set as a whole was reduced. In reality, both viewpoints are valid. These computers were built in the 1980s, such as Sun Microsystems’ (& Fujitsu’s) SPARC and IBM’s PowerPC.
RISC-V (pronounced as “risk five”) is an open-source hardware instruction set architecture. Born as a research project at the University of California, Berkeley in 2010, the idea was to produce a practical design with applications in business, science and industry; not just another academic exercise. Given a complete specification for a computer’s instruction set, one can then theoretically build one, assuming a lot of other things fall into place. Being a free and open-source project, anyone with the interest and wherewithal can manufacture their own computer chips and related devices, without having to pay licensing fees to the original developers. With annual consumption of such devices now in the billions of chips every year, perhaps you can start to understand the attendant interest from many sectors.
The RISC-V Foundation was started in 2015 to maintain and publish the specification and related documents for the architecture. This is the place to go to get the final (yet evolving) word on all things RISC-V. In November 2019, the foundation announced that they would be moving their headquarters from Delaware in the US to Switzerland, citing concerns over potential geopolitcal disruption.
Actual Chips You Can Buy Now
The first commerically available silicon implementing the RISC-V arcitecture was produced by SiFive in 2017. Their FE310 (“Freedom Everywhere”) device has an E31 Core that runs at 320 MHz. It is also available in Arduino form factor as the HiFive1. This won’t be the last time we talk about Arduino in this series.
Several other vendors are now producing parts in a variety of capabilites, including Western Digital and GigaDevice. We’ll be looking at one of GigaDevice’s offerings in more detail.
Specific Example: The Sipeed Longan Nano
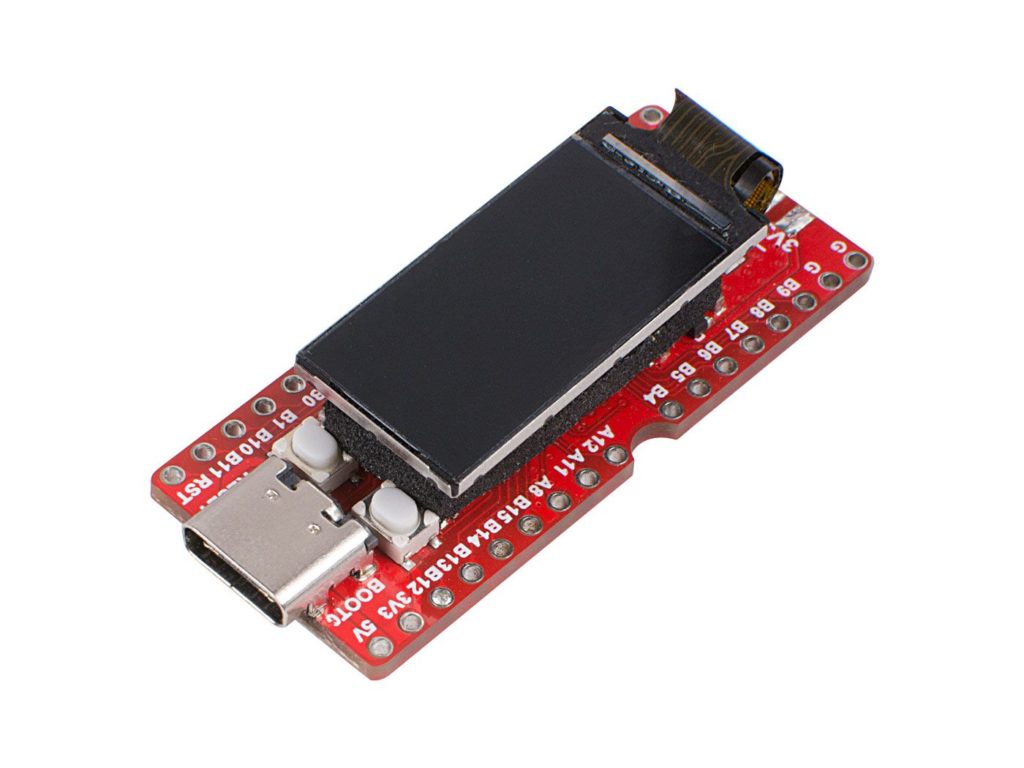
First spied in late August 2019 on the CNX Software blog, the Sipeed Longan Nano from Seeed Studios seemed too good to be true. I mentioned it to my friend and fellow robot enthusiast David Ackley. For only “$4.9”, they promised a RISC-V microcontroller by GigaDevice, the GD32VF103CBT6, with 128K of flash memory and 32K of SRAM, a color LCD and clear arcylic enclosure. Unfortunately, it was a “pre-order”, with the expectation of shipping on 13 October 2019. I was about to place an order, then backed out. Bolder David, on the other hand, went for it.
The expected shipping date slipped to 31 October 2019, but I eventually relented and placed an order for five (5) of the little beasties. With expedited shipping via DHL, the total came to just under $50. Luckily for me, Hyundai had been offering $50 gift cards to anyone who would take a test drive, so things just kind of lined up there.
Can’t Get There From Here
The Sipeed Longan Nanos shipped ahead of the final expected shipping date. Yay! Sadly, DHL dropped the ball. Once “out for delivery”, I got a message to “Contact DHL and update my address”. My house has been here for 20 years; no update needed. DHL has made several deliveries here in the past. After several phone calls to customer service, I told them to just hold the package in their Carrollton TX facility and I would pick them up on my next trip into town. You might like to know that the next DHL delivery from China suffered the same symptoms. This time I held my ground and steadfastly refused to let them fail, through an absurdly large number of phone calls to DHL customer service. Now (or again) they know the way.
Actual Hands On Actual Hardware
Now that I had working hardware in the lab, it was time to explore some of the finer details. The GD32VF103CBT6 specifications sounded oddly similar to the STmicroelectronics STM32F103CBT6, their medium-density performance line of ARM Cortex-M3 devices. It turns out that GigaDevice makes a line of devices that are “compatible” with ST’s offering. I’m not at all sure what their relationship is, exactly. However, it was a Good Thing because I was already quite familiar with the ‘F103, as it has been in production for over 12 years and is part of their 10 year longevity plan. While the core processor would be a RISC-V and not a Cortex-M3, the peripherals were almost identical. The two devices are also pin-compatible.
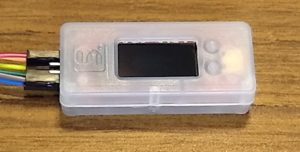
The enclosures that came with my five Longan Nanos were not the same as those pictured on the Seed Studios web site. Instead of crystal clear acrylic, they are of some softer, diffuse, translucent material. Two button caps fit inside the enclosure to activate the two PCB-mounted push buttons (BOOT and RESET).
The first hurdle I had to overcome was quite basic: USB-C. While I have boxes (and boxes) of USB cables here in the lab, not a one of them was the new-fangled USB-C type. Perhaps I’m not buying new phones often enough. Never fear! Amazon Prime* is here! I bought a package of three (3) cables [product link], each 2 meters long, for $5.89, although the price as of this writing is $6.49. Honestly, paying for USB cables was a novel experience these days. I’m usually trying to find Good Homes for my excess.
*I very rarely use Amazon Prime, mostly due to concerns about sustainability, but in some situations the ultra-mega-convenience wins over my love of the Earth and its future inhabitants.
Pushing Ones and Zeros
Time to bend this thing to my will. I followed the detailed instructions on the Sipeed Longan Nano page to set up their recommended delevopment environment. To summarize:
- Install Microsoft’s Visual Studio Code (VSCODE)
- Install the PlatformIO IDE plugin
- Install the GD32V platform definition
- Import an example project
- Set up the projet configuration file (platformio.ini)
- Compile
- Download (using DFU method)
- Confirm successful process (note blinking LED)
This process works, but it is not what I would call exceedingly convenient. Perhaps it was because it was my first experience using VSCode as a stand-alone product or PlatformIO. However, I did spend some time with this setup. I was able to add a little bit to the example program and blink all three colors of the built-in LED. Here is the code:
// main.c
// part of "GD32V-blink" project
// 28 October 2019
// Dale Wheat
// https://www.dalewheat.com

#include "gd32vf103.h"
#include "systick.h"

/* BUILTIN LED OF LONGAN BOARDS IS PIN PC13 */
// green = PA1, blue = PA2

#define LED_RED_PIN GPIO_PIN_13
#define LED_RED_GPIO_PORT GPIOC
#define LED_RED_GPIO_CLK RCU_GPIOC
#define LED_GRN_PIN GPIO_PIN_1
#define LED_GRN_GPIO_PORT GPIOA
#define LED_GRN_GPIO_CLK RCU_GPIOA
#define LED_BLU_PIN GPIO_PIN_2
#define LED_BLU_GPIO_PORT GPIOA
#define LED_BLU_GPIO_CLK RCU_GPIOA

void delay_1ms(uint32_t count) {
    uint64_t start_mtime, delta_mtime;
    // Don't start measuruing until we see an mtime tick
    uint64_t tmp = get_timer_value();
    do {
        start_mtime = get_timer_value();
    } while (start_mtime == tmp);
    do {
        delta_mtime = get_timer_value() - start_mtime;
    } while(delta_mtime < (SystemCoreClock/4000.0 *count ));
}

void main(void) {
    /* enable the led clock(s) */
    rcu_periph_clock_enable(LED_RED_GPIO_CLK);
    rcu_periph_clock_enable(LED_GRN_GPIO_CLK);
    /* configure led GPIO port(s) */
    gpio_init(LED_RED_GPIO_PORT, GPIO_MODE_OUT_PP, GPIO_OSPEED_50MHZ, LED_RED_PIN);
    gpio_init(LED_GRN_GPIO_PORT, GPIO_MODE_OUT_PP, GPIO_OSPEED_50MHZ, LED_GRN_PIN);
    gpio_init(LED_BLU_GPIO_PORT, GPIO_MODE_OUT_PP, GPIO_OSPEED_50MHZ, LED_BLU_PIN);

    GPIO_BC(LED_RED_GPIO_PORT) = LED_RED_PIN; // red LED on
    GPIO_BC(LED_GRN_GPIO_PORT) = LED_GRN_PIN; // green LED on
    GPIO_BC(LED_BLU_GPIO_PORT) = LED_BLU_PIN; // blue LED on
    GPIO_BOP(LED_RED_GPIO_PORT) = LED_RED_PIN; // red LED off
    GPIO_BOP(LED_GRN_GPIO_PORT) = LED_GRN_PIN; // green LED off
    GPIO_BOP(LED_BLU_GPIO_PORT) = LED_BLU_PIN; // blue LED off

    while(1) {
        GPIO_BC(LED_RED_GPIO_PORT) = LED_RED_PIN; // red LED on
        delay_1ms(1000);
        GPIO_BOP(LED_RED_GPIO_PORT) = LED_RED_PIN; // red LED off
        GPIO_BC(LED_GRN_GPIO_PORT) = LED_GRN_PIN; // green LED on
        delay_1ms(1000);
        GPIO_BOP(LED_GRN_GPIO_PORT) = LED_GRN_PIN; // green LED off
        GPIO_BC(LED_BLU_GPIO_PORT) = LED_BLU_PIN; // blue LED on
        delay_1ms(1000);
        GPIO_BOP(LED_BLU_GPIO_PORT) = LED_BLU_PIN; // blue LED off
    }
}

// [end-of-file]
In the platformio.ini project configuration file, I specified upload_protocol = dfu to allow me to download (upload?) the resulting binary file to the device using the built-in DFU (Device Firmware Update) using USB. This requires a specific button-press sequence on the Longan Nano to enter this mode:
- Press and hold the RESET push button
- Press and hold the BOOT push button
- Release the RESET push button
- Release the BOOT push button
With a little practice, this maneuver can be accomplished using a single finger rolling motion: “Roll up to upload”. The bits & bytes get magically transported to the flash memory of the device and you should be rewarded with a beautiful and colorful explosion of LED light.
In Summary
Let’s take stock of what we have at this point. We have working hardware based on the RISC-V core that offers a number of built-in peripherals that are uncannily similar to the STM32 Cortex-M3 devices we all know and love. We have a working software development environment that includes a compiler and facility to program the hardware using only a USB-C cable. Most importantly, we have a blinking LED that proves we are the true and rightful masters of our domain. Pretty cool, yes?
Next Time
Yes, we have accomplished much here, but there remain loftier goals to which we should set our sights. Debugging would be nice. A more streamlined device-programming cycle would also be desirable. We’ll explore some other viable alternatives in Part 2 of this series. Stay tuned!